2012年4月2日 星期一

[ubuntu] Edit fstab in recovery root-shell

在 Ubuntu 11.04 遇到了 fstab 設定錯誤以致於無法 mount 磁碟機,
可在開機選單選擇 Recovery Mode 進入修復模式,
在修復模式選單中可選擇使用 Root Shell 進入系統。

但此時系統為唯讀狀態,
無法修改任何 /etc/ 底下的設定檔,
紛紛會吐給你 Read-Only System 的訊息。
 此時輸入:
   # mount -o remount,rw /dev/sda1 / 即可重新 remount 磁碟機,並允許修改檔案。

2012年3月15日 星期四

Removing the 'Invalid Credentials... ' message from Bing Maps on WP7


How to remove the overlay message you can get when using the Bing Maps control on WP7. Now I've only ever seen this appear for two scenarios - invalid credentials or when in flight mode. It just so happens the control uses the same set of controls to display these messages, example shown below:


Now obviously they don't want you to hide\remove this message :)

The obvious way to remove the 'Invalid credentials...' message is to actual supply valid credentials, but what about if you want to remove the 'Unable to contact server.Please try again' when using the map control in flight mode.

Matt found a previous post that had done this, not sure how this guy was achieving this as the current build for the map control is sealed and access to the RootLayer property is not allowed...

This didn't stop me :) 

So XAML is all about composition - everything is built as layers of UI controls, known as the 'visual tree'. This means you can use extension methods to re-curse the visual tree. I used Colin Eberhardt's linq-to-visual-tree extension methods, available here (LinqToVisualTree.cs).

Here you go...
public partial class MainPage : PhoneApplicationPage
{
    bool removed;
        
    public MainPage()
    {
        InitializeComponent();

        map.ZoomLevel = 8;
        map.Center = new GeoCoordinate(49.109838, -5.976562);
        map.LayoutUpdated += (sender, args) =>
        {
            if (!removed)
            {
                RemoveOverlayTextBlock();
            }
        };
    }

    private void RemoveOverlayTextBlock()
    {
        var textBlock = map.DescendantsAndSelf()
                           .OfType<TextBlock>()
                           .SingleOrDefault(d => d.Text.Contains("Invalid Credentials") ||
                                                 d.Text.Contains("Unable to contact Server"));

        if (textBlock != null)
        {
            var parentBorder = textBlock.Parent as Border;
            if (parentBorder != null)
            {
                parentBorder.Visibility = Visibility.Collapsed;
            }

            removed = true;
        }
    }
}

And you get the following:

2012年3月8日 星期四

Making WPConnect Easier to Use


If you are building a Windows Phone application and you are using your phone to debug AND you are using the Photo Chooser or or the Camera Launcher task you may have found out that it will not let you access the camera or pictures while you are connected to Zune.
But, you have to be connected to Zune to debug on the phone.  Well, kind of.  The Windows Phone Team put out a tool called WPConnect.exe that allows you to dubug on the phone without having Zune open.
Here are the steps.
  1. Connect your phone
  2. Make sure Zune launches and connects to your phone.
  3. Shut down Zune
  4. Using a Dos Prompt, Navigate to
    1. (for 64 bit machines) C:\Program Files (x86)\Microsoft SDKs\Windows Phone\v7.1\Tools\WPConnect\x64
    2. (for 32 Bit machines) C:\Program Files\Microsoft SDKs\Windows Phone\v7.1\Tools\WPConnect\x86
  5. Type WPConnect.exe
It will then tell you that you are good to go.
NOW FOR THE EASY WAY
I got tired of having to navigate using a command prompt (Too may keystrokes) and I use this often enough to matter, so I created a shortcut for the Dos Prompt that takes me right to my designated spot in one click. Here is how you do it.
1. Right-click in the open space of your desktop and click New > Shortcut.
2. For the location, type or copy and paste the following:
%windir%\system32\cmd.exe /k
image
3. Click Next.
4. For the name, type something descriptive, like “Command Prompt for WPConnect” then click Finish.
image
5. Right-click on the new shortcut and choose Properties.
6. Change the “Start In” field to whatever directory you want the command prompt to start in.In my case, I want it to start in the 64 bit folder we talked about above:
"C:\Program Files (x86)\Microsoft SDKs\Windows Phone\v7.1\Tools\WPConnect\x64"

image
Be sure to include the quotation marks, and of course you would need to customize this file path to your own system (32 or 64).
Now when I want to use WPConnect.  I just use the pined shortcut
image
and Type WPConnect.exe
image

2012年1月30日 星期一

How to use Google Static Maps data in mobile applications


This article explains how to use Google Maps data in a mobile application.
Google Maps offers REST services that allow accessing its data with simple HTTP requests, so they can be easily integrated into mobile applications.

Sign up for a Google Maps API key

NOTE: Usage of this code with the free Google Maps API Key breaks Google's Terms and Conditions (section 10.8). You should purchase an Enterprise License if you wish to use the Google Maps API as shown in this example.
First you need to sign up on this page:
http://code.google.com/apis/maps/signup.html
Once you have signed up, you get a key (a simple string) that you can use for all your queries to Google Maps services.

Google Static Maps API no longer requires a Maps API key

For updated information on Google Static Maps API, please visit http://code.google.com/apis/maps/documentation/staticmaps/

Static maps

Standard Google Maps code is suitable for Web applications. However, it includes a lot of Ajax functionalities that are not really useful if you are building a mobile application. The solution is to use the static maps service that allows retrieving single images that can easily be used in mobile applications.
The static maps service supports different image formats (png32, GIF, JPG) and customizable image size, so you can get perfect images for all purposes. For example, if you want to retrieve the location at:
  • latitude: 41.867878
  • longitude: 12.471516
You can simply retrieve this URL with an HTTP GET request:
http://maps.google.com/staticmap?center=41.867878,12.471516&format=png32&zoom=8&size=240x320&key=<API_KEY>
This way you will get a PNG32 image with a width of 240 pixels and a height of 320 pixels, centered at point (41.867878,12.471516), and with a zoom level of 8 (the zoom range is from 0 to a maximum level of 19)
Google staticmap.jpg

Geocode an address

From Google Maps docs:
Geocoding is the process of converting addresses (such as "1600 Amphitheatre Parkway, Mountain View, CA") into geographic coordinates (like latitude 37.423021 and longitude -122.083739)
The following example describes building an application that displays the address typed by the end user. First you need to geocode its address into geographic coordinates.
To do this, Google Maps offers another REST service that can easily be accessed with simple HTTP requests.

If you want to geocode this address
Leicester Square, London
Request this URL from your code
http://maps.google.com/maps/geo?q=Leicester%20Square,%20London&output=csv&key=<API_KEY>
and you will get this output:
200,6,51.510605,-0.130728
Where:
  • The first number is a code, which in this case (200) means that geocoding has been successfull (for a full list of status codes see: [1])
  • The second number gives a measure of the geocoding accuracy (from 0 to 9 - maximum accuracy)
  • The 3rd and 4th numbers represent latitude and longitude of the geocoded address, so these are the coordinates used to retrieve the map through the static map service.
As you can see, there is an 'output' parameter in the geocode request. This means that you can choose the output format you prefer. The supported formats are:
  • xml
  • kml (same as xml, but with different Content-Type)
  • json (not really useful for mobile apps)
  • csv (comma-separated values)

Proxy server, usage limits

Since your Google Maps API key is bound to a specific URL, in order to access map services you need to setup a proxy server that will receive HTTP requests from the mobile application and forward them to Google Maps REST URLs, returning Google responses to mobile clients. (as pointed out in the Comment page, this is not a fully clear point yet)

Also, be aware that there is a limit to the number of requests, both for static maps and geocode service, you can do each day. For personal uses they are more than enough, but you need to keep this issue in mind if you plan to develop commercial services.

Sample application

J2me google maps.jpg
A sample J2ME application, using the approach described here, is available on this page: Google Maps J2ME Test
Google Maps J2ME API source code used in this example is also available here: J2ME Google Maps API
Reference To: http://www.developer.nokia.com/Community/Wiki/How_to_use_Google_Maps_data_in_mobile_applications

SETTING VISIBILITY BASED ON WP7 THEMES


INTRO

The Technical Certification Requirements for Windows Phone 7 applications state the following:
5.5.2 – Content and Themes
Application content, such as text and visual elements, must be visible and legible regardless of the phone theme. For example, if the phone theme changes from black background to white background, the text and visual elements of your application must be visible or legible.
This means that everything in you application, including images, should be well visible in the dark and light theming of the phone. Handling dark/light support is very easy.

DARK AND LIGHT

Often companies have a special version of their logos for different situations (Bing for example). For this demo I’ve created two logos, a black and a white one. The white logo should be used when the theme is set to dark, the other when a light theme has been selected.
Logo-WhiteLogo-Black
I’ve dropped these images into Expression Blend and grouped them together in a Grid control (Ctrl+G ). This grid is placed in the title panel, which resulted in the following XAML:
<StackPanel x:Name="TitlePanel" Grid.Row="0">
    <Grid>
        <Image Source="Logo-Black.png" />
        <Image Source="Logo-White.png" />
    </Grid>
</StackPanel> 


To get the white logo to be only visible when the dark theme is set, select the image of the white logo. With the image selected click on the “Advanced options”-peg:
image
Now, go to “System Resource” and select the “PhoneDarkThemeVisibility” resource.
image
At this point a green rectangle is placed around the visibility property of the images letting you know a resource is set on that property.
To get the same results for the dark logo, repeat the process on that images. But select the “PhoneLightThemeVisibility” instead.

TESTING

To test the results right in Expression Blend, got to the “Device” tab. On this tab you can set different device settings, including the Accent Color and the Light or Dark themes.
image
Switching from dark to light and back should result in the images below.
image

WRAP-UP

Setting the visibility like this can be done on every element in your XAML. And whenever you need to use the visibility for other purposes, there’s a similar resource for the Opacity.

[Windows Phone 7.5] Run multiple instances of the emulator


Hello everyone!
Today I bring you a little trick that can be very useful. It's being able to run multiple instances of the emulator for Windows Phone on the same PC.
image
This will tremendously help us if we are developing applications that interact between users, and may have 2 or 3 emulators in your PC with the launched application or if you want to take a long test of an application while working in another.
As we get it? The first thing we have to do is go to the Inbox AddOns from the Phone Tools we can find in the following path:
C:\ProgramData\Microsoft\Phone Tools\CoreCon\10.0\addons
Once there we will find a file called ImageConfig.en-US.xsl.If edit you with a text editor will see that you it's an XML with the data for the implementation of the emulator. Within this XML have to change three properties: the name of the emulator, the GUID for the emulator and the VMID GUID.
The first two will find them at the beginning of the file:
< DEVICE Protected = "true" Name = "Windows Phone Emulator" ID = "5E7661DF-D928-40ff-B747-A4B1957194F9" >
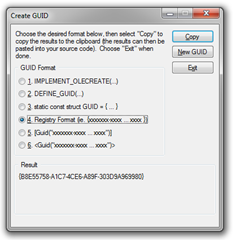
We need to generate a GUID, for example with the tool that includes Visual Studio Tools > Create GUID, it is important to write the GUID without the keys generated by the tool!
image
We also have to give it a unique name, for example "Windows Phone Emulator 2". The following key to modify the VMID, we can perform a search to locate it:
< PROPERTY ID = "VMID" Protected = "false" > 
{DF24EFAA-0FD3-44D1-8837-55E386D2905E} 
< /PROPERTY >
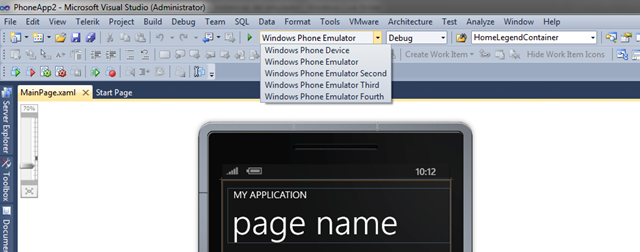
Here we have to copy another GUID, this time including the keys. Once done, if we open Visual Studio and load a Windows Phone project, we can see the different instances that run our application:
image
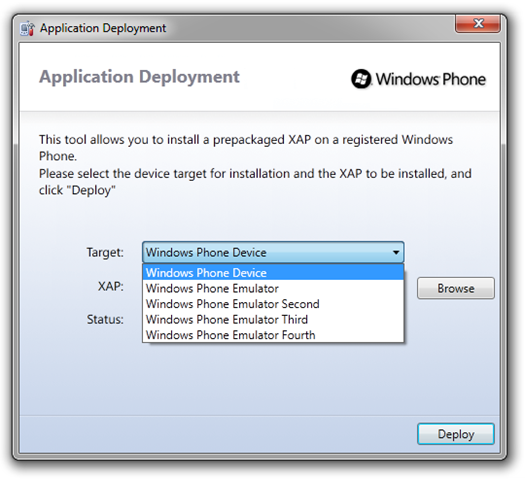
They also will be available in the application of deployment:
image
With this little trick can have several emulators on the same computer, in my tests have worked me extremely well up to a maximum of 3 emulators. With the 4th starting team has become unstable until block fully and I had to do a reset. It is very possible that this is due to that has not been able to gain control of a core by VT. Also, with 3 emulators initiates had been the same effect to answer a Skype voice call. However with 2 emulators I have not had any impact.Consumption is very low on memory, about 100 Mb per emulator, so do not think that the problem comes from memory, I think that more is a question of processor resources. My PC is a Core i7 with 4 cores / 8 threads and 8 Gb of RAM.
With this setting, having 3 initiated emulators not significantly affects the performance of the team.

2012年1月29日 星期日

hash map "Alias0": missing map file /etc/mail/aliases.db in FreeBSD jail

Problem:
Jan 30 18:11:22 hyder-home sm-mta[90213]: qJHNnr429401: SYSERR(root): hash map "Alias0": missing map file /etc/mail/aliases.db: No such file or directory

Solution:
# sendmail -bi
# ls -l /etc/mail/aliases.db


Reference To: http://gala4th.blogspot.com/2012/01/hash-map-alias0-missing-map-file.html