顯示具有 Windows Phone 7 標籤的文章。 顯示所有文章

2012年3月15日 星期四

Removing the 'Invalid Credentials... ' message from Bing Maps on WP7


How to remove the overlay message you can get when using the Bing Maps control on WP7. Now I've only ever seen this appear for two scenarios - invalid credentials or when in flight mode. It just so happens the control uses the same set of controls to display these messages, example shown below:


Now obviously they don't want you to hide\remove this message :)

The obvious way to remove the 'Invalid credentials...' message is to actual supply valid credentials, but what about if you want to remove the 'Unable to contact server.Please try again' when using the map control in flight mode.

Matt found a previous post that had done this, not sure how this guy was achieving this as the current build for the map control is sealed and access to the RootLayer property is not allowed...

This didn't stop me :) 

So XAML is all about composition - everything is built as layers of UI controls, known as the 'visual tree'. This means you can use extension methods to re-curse the visual tree. I used Colin Eberhardt's linq-to-visual-tree extension methods, available here (LinqToVisualTree.cs).

Here you go...
public partial class MainPage : PhoneApplicationPage
{
    bool removed;
        
    public MainPage()
    {
        InitializeComponent();

        map.ZoomLevel = 8;
        map.Center = new GeoCoordinate(49.109838, -5.976562);
        map.LayoutUpdated += (sender, args) =>
        {
            if (!removed)
            {
                RemoveOverlayTextBlock();
            }
        };
    }

    private void RemoveOverlayTextBlock()
    {
        var textBlock = map.DescendantsAndSelf()
                           .OfType<TextBlock>()
                           .SingleOrDefault(d => d.Text.Contains("Invalid Credentials") ||
                                                 d.Text.Contains("Unable to contact Server"));

        if (textBlock != null)
        {
            var parentBorder = textBlock.Parent as Border;
            if (parentBorder != null)
            {
                parentBorder.Visibility = Visibility.Collapsed;
            }

            removed = true;
        }
    }
}

And you get the following:

2012年3月8日 星期四

Making WPConnect Easier to Use


If you are building a Windows Phone application and you are using your phone to debug AND you are using the Photo Chooser or or the Camera Launcher task you may have found out that it will not let you access the camera or pictures while you are connected to Zune.
But, you have to be connected to Zune to debug on the phone.  Well, kind of.  The Windows Phone Team put out a tool called WPConnect.exe that allows you to dubug on the phone without having Zune open.
Here are the steps.
  1. Connect your phone
  2. Make sure Zune launches and connects to your phone.
  3. Shut down Zune
  4. Using a Dos Prompt, Navigate to
    1. (for 64 bit machines) C:\Program Files (x86)\Microsoft SDKs\Windows Phone\v7.1\Tools\WPConnect\x64
    2. (for 32 Bit machines) C:\Program Files\Microsoft SDKs\Windows Phone\v7.1\Tools\WPConnect\x86
  5. Type WPConnect.exe
It will then tell you that you are good to go.
NOW FOR THE EASY WAY
I got tired of having to navigate using a command prompt (Too may keystrokes) and I use this often enough to matter, so I created a shortcut for the Dos Prompt that takes me right to my designated spot in one click. Here is how you do it.
1. Right-click in the open space of your desktop and click New > Shortcut.
2. For the location, type or copy and paste the following:
%windir%\system32\cmd.exe /k
image
3. Click Next.
4. For the name, type something descriptive, like “Command Prompt for WPConnect” then click Finish.
image
5. Right-click on the new shortcut and choose Properties.
6. Change the “Start In” field to whatever directory you want the command prompt to start in.In my case, I want it to start in the 64 bit folder we talked about above:
"C:\Program Files (x86)\Microsoft SDKs\Windows Phone\v7.1\Tools\WPConnect\x64"

image
Be sure to include the quotation marks, and of course you would need to customize this file path to your own system (32 or 64).
Now when I want to use WPConnect.  I just use the pined shortcut
image
and Type WPConnect.exe
image

2012年1月30日 星期一

SETTING VISIBILITY BASED ON WP7 THEMES


INTRO

The Technical Certification Requirements for Windows Phone 7 applications state the following:
5.5.2 – Content and Themes
Application content, such as text and visual elements, must be visible and legible regardless of the phone theme. For example, if the phone theme changes from black background to white background, the text and visual elements of your application must be visible or legible.
This means that everything in you application, including images, should be well visible in the dark and light theming of the phone. Handling dark/light support is very easy.

DARK AND LIGHT

Often companies have a special version of their logos for different situations (Bing for example). For this demo I’ve created two logos, a black and a white one. The white logo should be used when the theme is set to dark, the other when a light theme has been selected.
Logo-WhiteLogo-Black
I’ve dropped these images into Expression Blend and grouped them together in a Grid control (Ctrl+G ). This grid is placed in the title panel, which resulted in the following XAML:
<StackPanel x:Name="TitlePanel" Grid.Row="0">
    <Grid>
        <Image Source="Logo-Black.png" />
        <Image Source="Logo-White.png" />
    </Grid>
</StackPanel> 


To get the white logo to be only visible when the dark theme is set, select the image of the white logo. With the image selected click on the “Advanced options”-peg:
image
Now, go to “System Resource” and select the “PhoneDarkThemeVisibility” resource.
image
At this point a green rectangle is placed around the visibility property of the images letting you know a resource is set on that property.
To get the same results for the dark logo, repeat the process on that images. But select the “PhoneLightThemeVisibility” instead.

TESTING

To test the results right in Expression Blend, got to the “Device” tab. On this tab you can set different device settings, including the Accent Color and the Light or Dark themes.
image
Switching from dark to light and back should result in the images below.
image

WRAP-UP

Setting the visibility like this can be done on every element in your XAML. And whenever you need to use the visibility for other purposes, there’s a similar resource for the Opacity.

[Windows Phone 7.5] Run multiple instances of the emulator


Hello everyone!
Today I bring you a little trick that can be very useful. It's being able to run multiple instances of the emulator for Windows Phone on the same PC.
image
This will tremendously help us if we are developing applications that interact between users, and may have 2 or 3 emulators in your PC with the launched application or if you want to take a long test of an application while working in another.
As we get it? The first thing we have to do is go to the Inbox AddOns from the Phone Tools we can find in the following path:
C:\ProgramData\Microsoft\Phone Tools\CoreCon\10.0\addons
Once there we will find a file called ImageConfig.en-US.xsl.If edit you with a text editor will see that you it's an XML with the data for the implementation of the emulator. Within this XML have to change three properties: the name of the emulator, the GUID for the emulator and the VMID GUID.
The first two will find them at the beginning of the file:
< DEVICE Protected = "true" Name = "Windows Phone Emulator" ID = "5E7661DF-D928-40ff-B747-A4B1957194F9" >
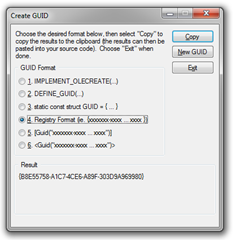
We need to generate a GUID, for example with the tool that includes Visual Studio Tools > Create GUID, it is important to write the GUID without the keys generated by the tool!
image
We also have to give it a unique name, for example "Windows Phone Emulator 2". The following key to modify the VMID, we can perform a search to locate it:
< PROPERTY ID = "VMID" Protected = "false" > 
{DF24EFAA-0FD3-44D1-8837-55E386D2905E} 
< /PROPERTY >
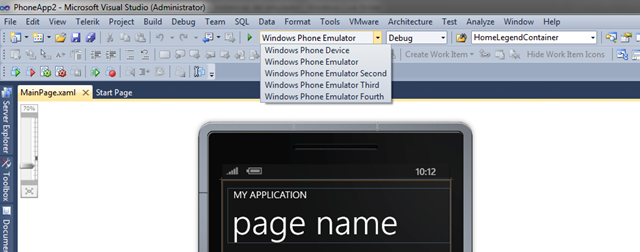
Here we have to copy another GUID, this time including the keys. Once done, if we open Visual Studio and load a Windows Phone project, we can see the different instances that run our application:
image
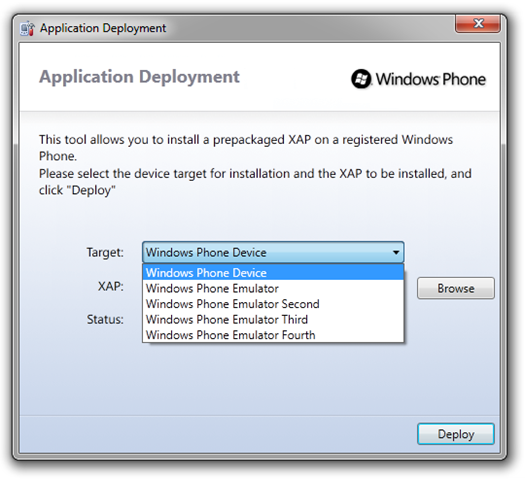
They also will be available in the application of deployment:
image
With this little trick can have several emulators on the same computer, in my tests have worked me extremely well up to a maximum of 3 emulators. With the 4th starting team has become unstable until block fully and I had to do a reset. It is very possible that this is due to that has not been able to gain control of a core by VT. Also, with 3 emulators initiates had been the same effect to answer a Skype voice call. However with 2 emulators I have not had any impact.Consumption is very low on memory, about 100 Mb per emulator, so do not think that the problem comes from memory, I think that more is a question of processor resources. My PC is a Core i7 with 4 cores / 8 threads and 8 Gb of RAM.
With this setting, having 3 initiated emulators not significantly affects the performance of the team.

2011年12月21日 星期三

Finding the Unique Device ID in Windows Phone 7 (And Device Manufacturer And Anonymous Windows Live ID)


  • Device Manufacturer ID
    • DeviceExtendedProperties.TryGetValue(“DeviceManufacturer”, out someObject);
    • example: “HTC”
  • Device ID
    • DeviceExtendedProperties.TryGetValue(“DeviceUniqueId”, out someObject);
    • requires ID_CAP_IDENTITY_DEVICE in the app manifest which will trigger a warning to users when they install the app
    • a byte[], converter to a string will looks like
      “12345678901234567890123456789012345678901234567890123”
  • Anonymous Windows Live ID
    • A 32 character subset at offset 2  of the results of
      “UserExtendedProperties.TryGetValue(“ANID”, out someObject)
    • requires ID_CAP_IDENTITY_USER in the app manifest which will trigger a warning to users when they install the app
    • looks like “00FF00FF00FF00FF00FF00FF00FF00FF”
However, if you just need any unique identifier (not necessarily a device ID), you can always set and store a new global unique identifier using:
Guid.NewGuid();
which will return a 128-bit integer that will look something like this:
“e81644f1-46b6-4994-2903-1d1f1440c130″
This will not cause warnings to appear when the app is downloaded because it isn’t a constant identifier to that specific device.
Reference To:

SQLite on WP7


“C# Sqlite Port for Windows phone 7 and possibly Silverlight 3, 4. The core engine was slightly modified to be used with IsolatedStorage and SqliteClient were ported by using missing codes from Mono project in order to maximize usability and portability from desktop.”
Although sterling works great, it is essentially an object-based database (NoSql-like)… If you truly need a relational database or if your application currently uses SQLite and you want to port it to Windows Phone 7, this might just be the answer!
Let’s get started… As with traditional ADO.NET, we first need to create a connection:
using (SqliteConnection conn = 
 new SqliteConnection("Version=3,uri=file:Super14Database.db"))
{
    conn.Open();
    // Use the connection here...
}
And now we can start using the database with “normal” SQL statements… Let’s create a table.
using (SqliteCommand cmd = conn.CreateCommand())
{
    cmd.CommandText = "CREATE TABLE matches ( [id] INTEGER PRIMARY KEY, _
 [team1] TEXT, [score1] INTEGER, [team2] TEXT, [score2] TEXT, [date] TEXT)";
    cmd.ExecuteNonQuery();
}
And to insert data:
cmd.Transaction = conn.BeginTransaction();
cmd.CommandText = "INSERT INTO matches(score1, team1, 
 score2, team2, date) VALUES(@score1, @team1, @score2, @team2, @date);";

cmd.Parameters.Add("@score1",  null);
cmd.Parameters.Add("@team1", null);
cmd.Parameters.Add("@score2",  null);
cmd.Parameters.Add("@team2",  null);
cmd.Parameters.Add("@date",  null);

cmd.Parameters["@score1"].Value = 20;
cmd.Parameters["@team1"].Value =  "Blues";
cmd.Parameters["@score2"].Value =  34;
cmd.Parameters["@team2"].Value =  "Hurricanes";
cmd.Parameters["@date"].Value =  "12/02/10";
cmd.ExecuteNonQuery();


cmd.Parameters["@score1"].Value =  15;
cmd.Parameters["@team1"].Value =  "W Force";
cmd.Parameters["@score2"].Value =  24;
cmd.Parameters["@team2"].Value =  "Brumbies";
cmd.Parameters["@date"].Value =  "12/02/10";
cmd.ExecuteNonQuery();

cmd.Parameters["@score1"].Value =  34;
cmd.Parameters["@team1"].Value =  "Cheetahs";
cmd.Parameters["@score2"].Value =  51;
cmd.Parameters["@team2"].Value =  "Bulls";
cmd.Parameters["@date"].Value =  "12/02/10";
cmd.ExecuteNonQuery();

cmd.Parameters["@score1"].Value =  32;
cmd.Parameters["@team1"].Value =  "Crusaders";
cmd.Parameters["@score2"].Value =  17;
cmd.Parameters["@team2"].Value =  "highlanders";
cmd.Parameters["@date"].Value =  "12/02/10";
cmd.ExecuteNonQuery();

cmd.Parameters["@score1"].Value =  28;
cmd.Parameters["@team1"].Value =  "Reds";
cmd.Parameters["@score2"].Value =  30;
cmd.Parameters["@team2"].Value =  "Waratahs";
cmd.Parameters["@date"].Value =  "12/02/10";
cmd.ExecuteNonQuery();

cmd.Parameters["@score1"].Value =  13;
cmd.Parameters["@team1"].Value =  "Lions";
cmd.Parameters["@score1"].Value =  26;
cmd.Parameters["@team2"].Value =  "Stomers";
cmd.Parameters["@date"].Value =  "12/02/10";
cmd.ExecuteNonQuery();

cmd.Parameters["@score1"].Value =  18;
cmd.Parameters["@team1"].Value =  "Sharks";
cmd.Parameters["@score2"].Value =  19;
cmd.Parameters["@team2"].Value =  "Chiefs";
cmd.Parameters["@date"].Value =  "12/02/10";
cmd.ExecuteNonQuery();
                    
cmd.Transaction.Commit();
NOTE: Notice the transaction support build in!
To fetch data from the database:
cmd.CommandText = "SELECT * FROM matches";
using (SqliteDataReader reader = cmd.ExecuteReader())
{
    while (reader.Read())
    {
        var team1 = reader.GetValue(1);
        var score1 = reader.GetValue(2);
        var team2 = reader.GetValue(3);
        var score2 = reader.GetValue(4);
        var date = reader.GetValue(5);
    }
}
And that’s it! It is more verbose but it does work great and the translation from a normal desktop application that used SQLite should be simple!


Reference To:
http://www.codeproject.com/Articles/151179/SQLite-on-WP7

Windows Phone 7 Emulator Skin Switcher 1.0 Beta


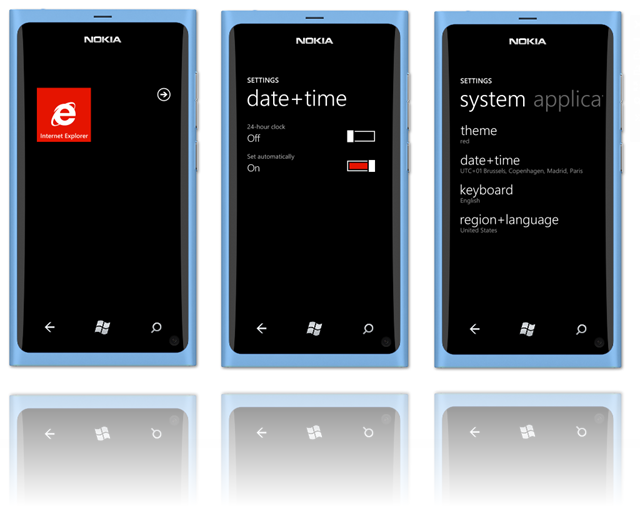
In the last few weeks several people started creating their own skins for the Windows Phone 7 Emulator. Switching between different skins was a lot of work by copying files manually to the emulator directory every time you wanted to switch. From now on this is not needed anymore because you can use the Windows Phone 7 Emulator Skin Switcher application I’ve created.
wp7EmulatorSkinSwitcher
You can download the application here: Download
This version is the first beta release with my first set of skins. I added 2 skins from Georg Kalus: the Blue Nokia Lumia 800 and the White/Pink Nokia Lumia 710. I’ve also included the Black Nokia Lumia 800 skin from Pedro Lamas
The complete list of skins included in the application now are:
I’m planning on adding more skins in the near future but didn’t have time for it yet. If you have skins I can use please let me know by comment or on twitter
lumia710whitelumia800pinklumia710black

Hopefully this will make your Windows Phone 7 projects even more fun to test!